|
Online Patternmaking Classes
by Don McCunn Underwire Bra Home Page ► Week Three ► Go To Week Four From the Mold to the Muslin SloperAfter you have created a Bra Sloper Mold transfer the three-dimensional shape of the mold to a flat paper pattern then sew a trial muslin sloper to verify the fit. When you first start sewing a Bra Sloper it is easy to get lost about which piece goes where. I have added some Watch Points to help you navigate through this process. You might want to print out a copy to keep it next to you as you work. For those who want to create bra cups with foam, I have included some additional videos which show the process for an actual bra. The same technique can be used to verify the fit of a sloper. Simply sew the foam to the muslin. I have included the videos for the foam bra cups in this week as these videos are my latest bra videos. They emphasize the best techniques you can use to avoid problems that can arise when you are creating either the bra slopers or wearable bras. Even if you are not using foam, I highly recommend you watch these videos. The process of converting the three-dimensional mold shape to a two-dimensional pattern is a basic technique for this approach to bra making. The pattern for the Bridge that spans from center front to the inside edge of the Bra Cup will be a flat pattern. The Back Band from the side of the Bra Cup to center back should also be a flat shape. But the Bra Cup will be a distinctly three-dimensional dome like shape. To change the Bra Cup to a two-dimensional shape, first separate the cup along the vertical Apex and horizontal Bust lines. This will divide the bra cup into 4 quadrants. You then need to analyze each quadrant to see if additional seam lines are required so the mold shape will lie flat. The videos for this week demonstrate this process. It is very important during the process of creating the pattern pieces to carefully mark each line with sewing notches and each pattern piece with labels. See page 120 of the book for an example of these markings. When you are sewing the sloper together, I suggest keeping the pattern pinned to each part of the bra until you are ready to sew. Then just before you sew a new section, remove the pattern and flip the fabric so that you have a left and right side for the bra cups. This process is shown in the photos below and the video for Sewing the Sloper. Some people have found they even like to write the notations from the pattern on the fabric to avoid any possible confusion during the sewing process. 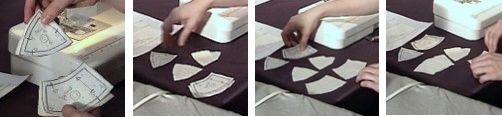 The Mold Shapes Convert the Mold to Patterns Preparing the Paper Patterns The Rib Cage Pattern Sewing the Sloper Finishing the Sloper Foam Bra CupsAn Overview Prepare the Foam Sew the Foam Sew the Cup Underwire Bra Home Page ► Week Three ► Go To Week Four
Copyright © 2007, & 2020 by Donald H. McCunn
|