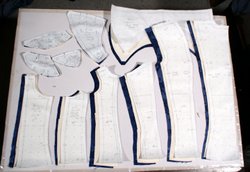
To create these corsets, you will need the following materials. The use of white steel boning is described but you may substitute 1/4" spiral steel boning.
The bra cup for the sloper uses seam lines to identify the horizontal full bust level and the vertical bust apex. The instructions below show how the cup may be redesigned with different seam locations. First you need to create the initial cup of the sloper out of posterboard, then change this cup to the new design.
Prepare a Posterboard Cup
Copy the sloper bra cup patterns on to posterboard. Include the labels and the sewing notches.
Cut out the posterboard along the seam lines.
Matching the sewing notches, tape the posterboard together.
Draw in new seam lines on the posterboard copy.
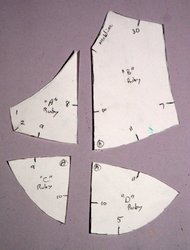
Posterboard Bra Cup
Restyle the Bra Cup
Use the posterboard cup to draw new design lines. There are two basic types of design lines. The first adjusts the location of the neckline. The second adjusts the internal lines of the cup. When you are create the second set of lines, maintain as much of the shape of the original cup as possible.
Draw in new seam lines on the posterboard copy using the styling determined on the muslin mock-up.
Add sewing notches along the new seam lines.
Cut out the posterboard along the new design lines.
Verify that the new pattern shapes will lie relatively flat.
To verify the shaping, trace the new pattern shapes on to posterboard and tape them together.
After the desired shaping is achieved, transfer the posterboard shapes to pattern paper.
Restyling the Posterboard Bra Cup from a Muslin Mock-Up
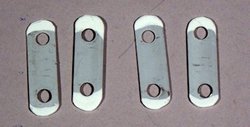
Lacing bones are white steel bones that have holes drilled for 00 size grommets. They allow for the grommets to be closely place to the edge of the fabric. The Zipper Opening Corset uses grommets to secure the shoulder straps. Lacing bones are used to keep the grommets separated by an appropriate distance. The Front Lacing Corset uses lacing bones for the center front opening. The instructions below show how the lacing bones are installed for the Front Lacing Corset.
Both corsets described here use the double layer construction technique. The lacing bones are installed after the fashion fabric has been sewn to the lining fabric. Before following the instructions below, verify that your grommet punch is smaller than the hole in the lacing bone.
Pin the lacing bone between the fashion fabric and the lining so it is tight against the seam.
Use a zipper foot to top stitch the fashion fabric to the lining close to the lacing bone the same way you install a regular bone. For lacing bones in shoulder straps, you may want to use a basting stitch that can be removed later.
Determine the location of the grommet at the top of the corset, then punch a hole with the grommet punch.
Insert a grommet in this first hole.
Punch a hole at the bottom of the lacing bone, then insert a grommet.
Continue punching the remaining holes, then insert the grommets.
For double layer corsets, boning channels are created by top stitching the fashion fabric to the lining. When the boning is to be located along the seams, keep the first line of stitching close to the seam. Then insert a length of boning as a guide for the other side of the boning channel. The instructions below illustrate this process which is used for both corsets described here.
When you are creating these channels using two layers of non-stretch fabric, sew along all the seams first, then add the second line of stitching to hold the bones in place.
When using a fashion fabric that stretches, create the boning channels as described below.
Pin through a seam of the fashion fabric into the same seam of the lining so they are aligned one over the other.
For the first edge of the boning channel, sew within an 1/8" (2 mm) of the seams.
Insert a length of boning next to the stitching from Step 2, then use a zipper foot to sew the other side of the boning channel.
Repeat Steps 1 through 3 for each seam that is to have boning.
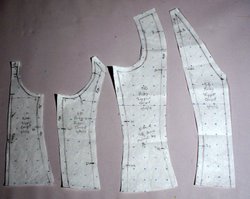
The first step is to create a paper copy of the sloper pattern so you can make adjustments for a specific design and record the information used to create the corset. Do not copy the seam allowances from the sloper, only the sewing lines.
For this corset, the first step is to adjust the bra cup pattern as described in the first chapter, see Restyling the Bra Cup. You can then make adjustments to the patterns for the body of the corset. For this design, there are three adjustments that need to be made to the sloper. First change the center front for the zipper. Then adjust the body of the corset for the powernet in the side back panel. Finally change the shoulder strap to accommodate the grommets.
Preparing Center Front for a Zipper Opening
To leave the teeth of the zipper exposed, move the center front line 3/8" (9 mm) in.
Adjust the top of the center front panel to match the restyled bra cup.
On the side front panel, mark the sewing notches for aligning the bra cup.
Add 1/4" (6 mm) seam allowances to the center front and the bra cup seams.
Add 1/2" (12 mm) seam allowances to the top of the center front panel and the side front seams.
Adjusting the Body
The body of the corset needs to be adjusted for the powernet in the side back panel.
To compensate for the stretch of the powernet, reduce the side and side back seams by 1/2" (12 mm) on the side front, side back, and center back panels.
Adjust the armscye and back neckline to the desired design lines.
Add 1/2" (12 mm) seam allowances to the armscye, back neckline, side, side back, and center back seams.
The design of the shoulder strap can now be established. For this corset, the shoulder strap which is joined to the side back panel will be made with a non-stretch fabric to accommodate the grommets.
On the side back pattern, move the position of the shoulder seam to the new design location at the top of the shoulder.
To create the front shoulder strap pattern, use the patterns from the muslin mock-up. Match the pattern for the top of the bra cup to the pattern for the front shoulder of the side back pattern. On a clean sheet of paper, trace these pattern shapes up to the new shoulder seam established in Step 1.
Draw in the location of the grommets on the shoulder strap.
Add 1/2" (12 mm) seam allowances to all the seams.
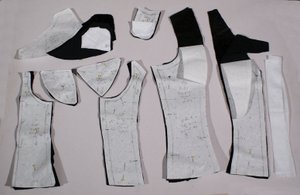
Cut out all the patterns in fashion fabric.
Cut out the bra cup, center front, side front and center back patterns in lining fabric.
Cut out the side back pattern in powernet.
Cut out 1-1/2" strips of fusible interfacing for the grommet locations.
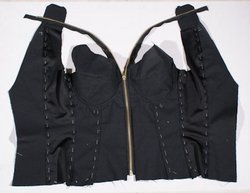
There are three basic steps for sewing this corset using the double layer technique.
Sew the panels for the body of the garment in the fashion fabric and the lining.
Sew the zipper to the lining, then the lining to the fashion fabric. Sew the front, top, and back of the corset as one continuous seam.
Add the grommets, boning, and finish the bottom of the corset.
Sewing the Body of the Garment
Sew the panels for the body of the corset in the fashion fabric and the lining including the bra cup. This is the same procedure used to sew the muslin mock-up of the shoulder strap corset.
Baste the seam allowances toward the corset's side.
Pin the bra cup into the body of the garment, then sew with a 1/4" (6 mm) seam. This tends to work best when the cup is held against the free arm of the sewing machine.
Hand baste the underwire casing into the lining, then sew.
Sew the zipper to the lining first. This ensures its correct alignment in the corset. After the zipper is inserted into the lining, sew the fashion fabric and lining with the zipper sandwiched between the two layers.
Sewing Tip - The cloth portion of many zippers is made from synthetic fabric. This fabric can be cut with a hot knife to finish and seal the end of the zipper just above the zipper stop.
Use a zipper foot to machine baste the zipper into the lining.
Adjust the position of the zipper stop to the top of the corset removing the zipper teeth as necessary.
Trim the top of the zipper to just above the zipper stop. If the zipper fabric is synthetic, you can cut and seal the top of the zipper using a hot knife.
Important note: before proceeding further, verify the corset's fit for this combination of fabric.
Open the zipper to separate the left and right side of the corset.
Pin the fashion fabric to the lining, right sides together, with the zipper teeth sandwiched between the two layers of fabric.
Sew the fashion fabric to the lining along the center back, top, and center front of the corset leaving only the bottom open.
Trim then turn the corset right side out.
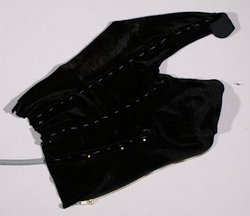
Zipper Basted into Lining
Finishing the Corset
For this example, the bottom edge of the corset is sewn using a stitch-in-the-ditch technique to accommodate the stretch of the side back panel.
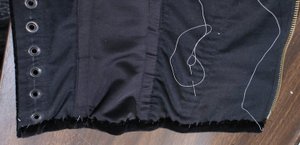
To finish the corset, add grommets at center back as described in Construction Basics Adding Spiral Steel Boning. Insert the lacing bones for grommets at the top of the bra cup and the shoulder strap. Then add boning to the body of the corset.
Prepare the bottom edge of the corset by zigzagging the fashion fabric to the lining.
Align the edge strip along the bottom of the corset, right sides together, with the raw edges aligned. Fold back the ends of the bias tape so they will be encased when finished, then pin in place.
Use a 1 mm zigzag stitch to sew the edging strip to the body of the corset.
Turn the edging strip good side up, then press.
Turn the raw edge of the edging strip under and press.
Roll the edging strip over the corset so the folded edge covers the seam created in Step 3, then hand baste in place.
From the good side of the corset, sew a 1 mm zigzag stitch along the seam created in Step 3.
From the inside of the corset, verify that the stitches from Step 7 have secured the fold of the edging strip.
Create a paper copy of the sloper pattern so you can make adjustments for a specific design and record the information for creating the corset. Do not copy the seam allowances from the sloper, only the sewing lines.
For this corset, the first step is to adjust the cup pattern as described in the previous chapter. You can then make adjustments to the patterns for the body of the corset. In this design, there are three changes to the sloper.
To add a stand up collar, eliminate the center back lacing.
Adjust the pattern to leave a slight gap for the front lacing.
Restyle the shoulder strap for a sweetheart neckline.
Stand Up Collar Pattern
Print the Stand Up Collar pattern. This pattern may be used as is or modified for fit and/or appearance. The second half of the video below shows how to redesign the collar.
Print a copy of the pattern.
Cut out a copy of the pattern in posterboard. After you have sewn the lining for the corset, use this posterboard collar to verify fit and/or appearance.
Trial Posterboard Collar
Adjusting the Body of the Pattern
Start by Restyling the Bra Cup. Then adjust the pattern to create a slight opening for the center front lacing.
There are two basic steps for creating this corset using the double layer technique.
Sew the panels for the body of the garment in the fashion fabric and the lining separately, then sew the collar.
Combine the fashion fabric to the lining and add the grommets and boning.
Sew the Fashion Fabric & Lining Panels and Collar
Sew the panels of the corset's body in the lining fabric, including the bra cup. This is the same procedure used to sew shoulder strap corset's muslin mock-up.
Important Note: Before proceeding further, verify the corset's fit in this combination of fabric.
Sew the panels of the corset's body in the fashion fabric, including the bra cup.
Baste the seam allowances toward the side.
Pin the bra cup into the body of the garment, then sew with a 1/4" (6 mm) seam. This tends to work best when the cup is held against the free arm of the sewing machine.
Hand baste the underwire casing into the lining, then sew.
To add a waist stay, sew a length of twill tape at the waist level across the full width of the lining.
To make the lining slightly smaller than the fashion fabric, trim it down 1/8" (3 mm) along the front and top edges.
Zigzag the fiber fill for the collar to the collar lining.
Pin the two layers of collar fashion fabric, good sides together, then pin the lining to the wrong side of one layer of fashion fabric.
Sew the collar around the front and top edges, then trim, clip, and turn right side out.
Finishing the Corset
For this corset, sew the shoulder strap into the body of the corset where the bra cup meets the side front panel. To achieve a finished edge, sew the perimeter of the corset's front and top leaving an opening where the shoulder strap is to be attached. Leave the top of the shoulder strap open. After sewing the edge, turn the corset right side out and sew the shoulder strap in place.
Pin the fashion fabric to the lining, right sides together, with the collar sandwiched between the two layers of fabric.
Use pins or a marking pen to indicate where the shoulder strap will be sewn into the body of the garment.
Sew the fashion fabric to the lining around the corset's front and top, leaving the shoulder strap areas and bottom of the corset open.
Trim then turn the corset right side out.
Insert underwires into the underwire casings.
At the marks from Step 2, pin the top of the shoulder strap to the lining of the corset's body, then sew.
Turn the shoulder strap seam allowance to the corset's inside and top stitch in place.
Press, then top stitch around the front, top, and armhole of the corset close to the edge.
Add the lacing bones and grommets at center front as described in Using Lacing Bones.

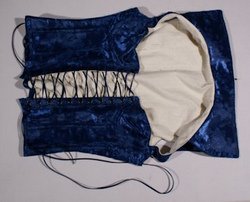
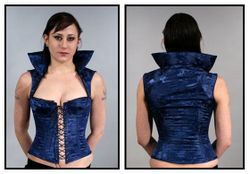
 Zipper Corset
 Front Lacing Corset