|
Online Patternmaking Classes
by Don McCunn Corset Home Page ► Week Three ► Go To Week Four The Shoulder Strap PatternThe shoulder-strap pattern creates a corset that extends above the bust and provides support from the shoulder. These instructions are a continuation of the procedures described for the rib cage portion of the corset in The Underbust Pattern. There are three basic steps to follow.
Materials and ToolsTo create a Shoulder-Strap Corset you will need the following materials and tools. These instructions show how to use an, optional powernet in the side back panel to create a corset that is less restrictive than a corset that has no stretch.
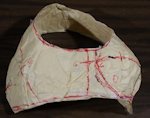
Create a Body WrapUse the steps below to create a body wrap starting from an Underbust Body Wrap. The first video for each step shows the process as a two-person operation. The second video shows it as a do-it-yourself, DIY, process.
Applying Press'n SealTwo-Person Mold
DIY Mold Draw the Design LinesDetermining the seam lines is best done before you remove the body wrap. When this is a two person operation, you can draw in the complete design lines. When you are doing it yourself, just make marks at key reference points, then complete the lines after you have removed the body wrap. Two Person Design Lines
DIY Design Marks Create the Paper PatternsPaper patterns will be a more stable record of the corset shapes than the Press'n Seal body wrap. After you have removed the body wrap, use the steps below to create the paper patterns.
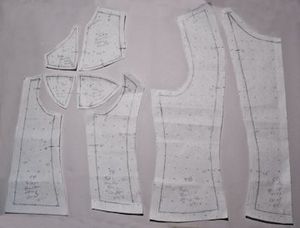
Label and Cut the Body WrapShoulder Strap Shapes Before you cut the body wrap, label each section and add sewing notches. The sewing notches are important because they are the most reliable fixed reference when you start to cut the body wrap apart. If you are working from a DIY body wrap, draw in complete design lines.
Use the Body Wrap to Create Paper PatternsThe body wrap shapes can now be traced to create paper patterns. In this example the underbust shape was taken from the left side of the body. The body wrap for the shoulderstrap was taken from the right side of the body. When you trace the body wrap pieces, transfer the sewing notches from the outside of the body wrap to the inside. This process will be clearer if you have the center front and center back lines clearly marked. The final step is to verify the length of the seam lines and add seam allowances. If you use 3/4" (18 mm) seam allowances, the seam allowances can be used as channels for 1/2" (12 mm) boning in fitting a muslin mock-up. Use 1/4" (6 mm) seam allowances for the cup. Prepare the Pattern
 Completed Paper Pattern Create and Fit a Muslin Mock UpTo verify that the pattern shapes are correct, create a muslin mock-up of the Shoulder-Strap Corset. For sewing the rib cage portion of the garment, including adding boning, see the instructions in The Underbust Pattern.
Sew the Corset
 Shoulder-Strap Muslin Mock-Up Fit the MuslinThe final step in creating the patterns is to fit the muslin mock-up. There may be little or no fitting required. During this process, you will be able to see how the fabric works on the body so that you can make refinements for any design you may wish to create. Fit the Muslin
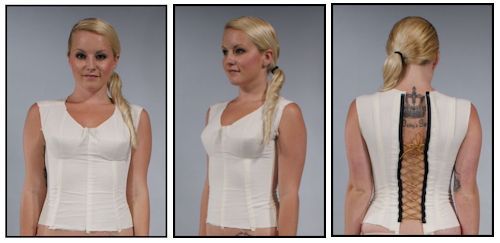 Front, Side, & Back of the Muslin Mock Up 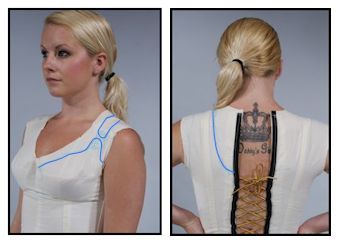 Design Lines Corset Home Page ► Week Three ► Go To Week Four
Copyright © 2007, & 2020 by Donald H. McCunn
| |||||||||
 Shoulder-Strap Wrap
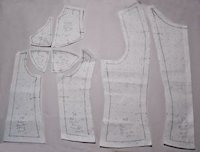 Paper Patterns
 Muslin Mock-Up