|
Online Patternmaking Classes
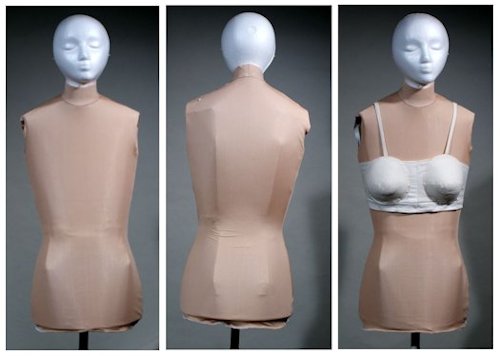
by Don McCunn Body Double Home Page ► Week One ► Go To Week Two The Torso FormsThe Body Double recreates an accurate representation of a specific body by converting the two-dimensional sloper patterns back into a three-dimensional form using the semi-stiff mat board. But the fitted slopers include ease to accommodate movement. For the Body Double, this ease needs to be removed. In addition, if you want an accurate representation of the bust area for a woman, this area of the pattern needs to be reduced to the size of the rib cage so that a bra form or stuffed bra can be added. In addition to adjusting the slopers you will need to create patterns for the Cross Sections of the body at the waist and hips. An optional step is to cover the Body Double with a stretch fabric that can hopefully be found that comes close to the skin tone of the person the Body Double is being made for. ContentsCreate the Torso PatternsThe first step in creating a Body Double is to remove the ease from the sloper patterns. To do this, create new patterns specifically for the Body Double. The procedures shown in the videos below are also in How to Make Sewing Patterns on pages 163 & 164, 2nd ed. (pages 180 & 181, 1st ed.). See also the Remove Ease pdf file. Lower Torso Pattern Upper Torso Pattern Create the Cross Section PatternsIn order to have the Body Double reflect the three-dimensional shape of the body patterns are required that show the cross sectional shape of the body at the waist. In How to Make Sewing Patterns I describe how to create a cross section for the waist (aka Waist Circle) on page 165, 2nd ed. (pages 182 & 183, 1st ed.). The Hip and Posture patterns are used to create accurate waist-to-hip bases for the stands. Waist Cross Section Pattern A refinement of the Body Double not included in my book shows how to confirm the posture by adding a Hip Cross Section and taking some additional measurements that show the relationship between the waist and hips, see also the Cross Section pdf file. Hip Cross Section Pattern Pattern for the Posture Combined Cross Section Patterns Create the Torso FormsTo create a Torso Form, transfer the shapes from the patterns to mat board, then tape the mat board sections together. These instructions show how to create a Torso Form that combines the upper and lower torso sections without a stand. This type of Custom Dress Form can be taped to a stool for full length garments. If you plan to create a stand or add legs as described in the subsequent weeks, you can mount the lower torso on the stand or legs before adding the upper torso. Tip for shaping mat board: Lightly mist the mat board where you need to bend it, particularly in the shoulder area. After shaping the mat board, dry it before taping the darts or seams. Cut the Lower Torso Form Tape the Lower Torso Form Cut the Upper Torso Form Tape the Upper Torso Form Cut the Waist Cross Section Add the Waist Cross Section Combine the Torso Forms Add the NeckThe final step in creating a working Body Double is to add a neck. The neck pattern can be made with the technique used for creating a Mandarin Collar described in How to Make Sewing Patterns on pages 122 & 123, 2nd ed. (pages 134 & 135, 1st ed.). Draft the Neck Drape the Neck Add the Neck Bra FormThese instructions show how to recreate the shape of a woman's bust from a Bra Sloper made using the instructions in How to Make Custom-Fit Bras & Lingerie. The muslin version of the Bra Sloper extends from above the bust to the rib cage. The procedure for determining underwire size creates a copper ring to determine where the breast tissue meets the rib cage. This copper ring is used to create the inside shape of the Bra Form that is stitched to the muslin sloper. The resulting form is then padded out to the three-dimensional shape of the bust with cotton batting or the batting from an old pillow. As shown in the introduction, these bra forms can be used to represent the various shapes of the body when different bra styles are used such as minimizer, medium, maximizer, and bullet bra shapes. The Underwire Shape Create a Bra Form As these instructions are not included elsewhere, here are the specific steps to follow.
Body Double CoverTo make a Body Double Cover from non-stretch fabric, make a copy of the Body Double patterns, then add seam allowances. Sew these patterns as you would make any garment. You will need to add an opening such as a zipper at center back. These instructions in the following two videos show how to make a Body Double Cover from stretch fabric such as Tricot. Body Double Cover, Part One
Body Double Cover, Part Two
 Body Double Home Page ► Week One ► Go To Week Two
Copyright © 2007, & 2020 by Donald H. McCunn
|